

Installing vinyl replacement windows yourself can save you 20–35% on installation costs, but getting it right is essential to avoid problems like drafts, water leaks, or voided warranties. This guide walks you through the entire process, from preparation to sealing, ensuring long-lasting performance and energy efficiency. Choosing the right energy-efficient glass packages is also a key factor in maximizing these benefits. Here’s a quick breakdown of the key steps:
- Preparation: Gather tools like a level, caulking gun, and shims, and wear safety gear like gloves and goggles.
- Removing the Old Window: Carefully take out the trim, sash, and frame without damaging the surrounding area.
- Preparing the Opening: Clean, inspect, and flash the opening to ensure a level, waterproof base.
- Installing the New Window: Test-fit the window, secure it with screws, and ensure it operates smoothly.
- Finishing Touches: Insulate gaps with low-expansion foam, apply sealant, and clean the window.
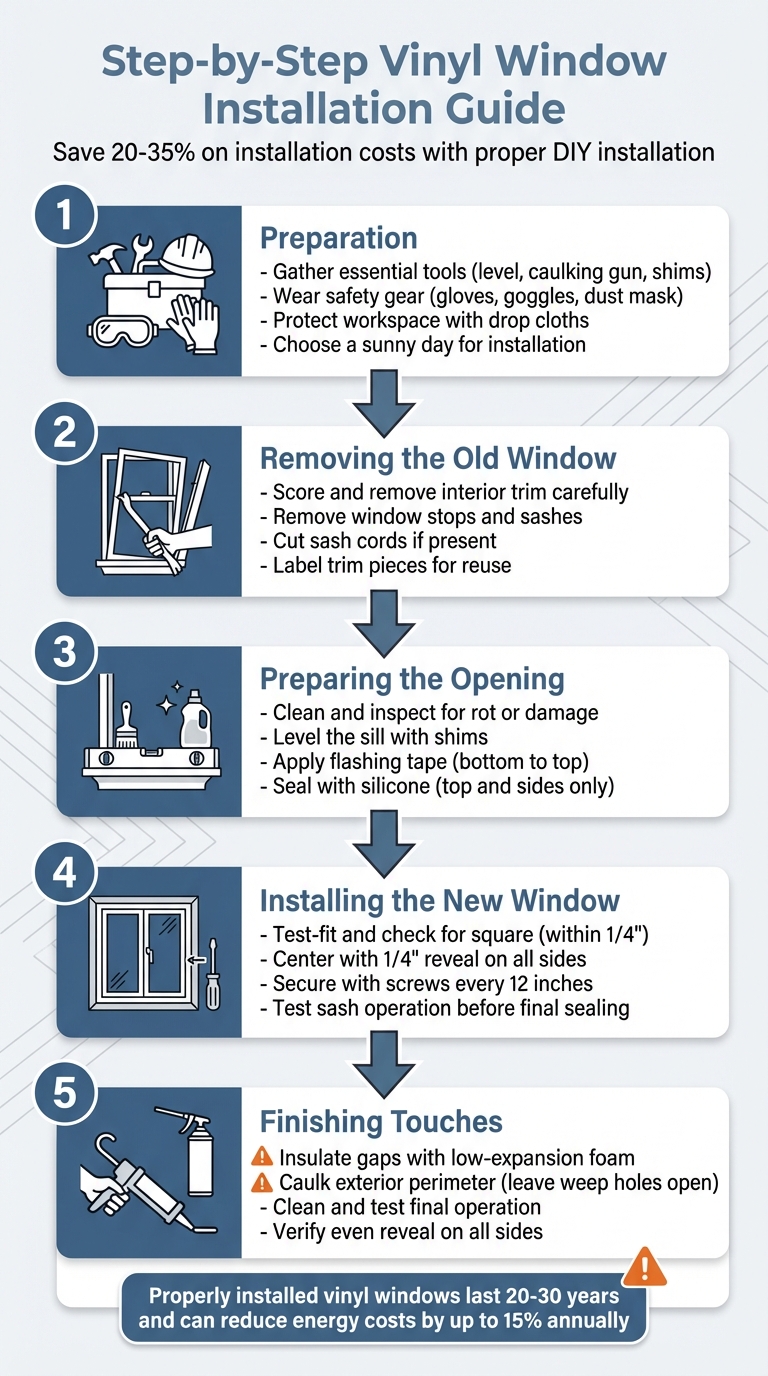
5-Step Vinyl Window Installation Process Guide
Preparation and Safety Requirements
Getting everything in order before starting your window installation can make the process much easier and safer. Proper preparation not only helps the project run smoothly but also ensures your warranty stays intact and your windows perform well over time. Having all the tools ready eliminates those frustrating last-minute trips to the hardware store, and safety gear keeps you protected from hazards like flying debris, sharp edges, and dust.
Required Tools and Materials
Start by gathering the tools and materials you’ll need. For measuring and layout, have a tape measure, a 4-foot level, a torpedo level, and a speed square. For removing the old window, you’ll need items like a standard pry bar, a flat pry bar, a hammer, a utility knife, a putty knife, and a paint scraper. If you want to speed up the process, an oscillating multi-tool can be helpful, though it’s not a must.
For the actual installation, key tools include a power drill with various bits, a smooth-rod caulking gun, pliers, and a staple gun. A J-roller is crucial for pressing down flashing tape to ensure a watertight seal. On the materials side, make sure you have composite or wood shims, 100% silicone or hybrid STPE sealant, low-expansion spray foam rated for windows and doors, 6-inch wide self-sticking flashing tape, and the appropriate fasteners. These include 1½-inch exterior screws or roofing nails for the frame, as well as 2¼-inch stainless steel screws and 2-inch galvanized finish nails for trim work.
It’s important to use only low-expansion foam and 100% silicone or hybrid STPE sealant. Using the wrong materials can warp the vinyl frame and void your warranty.
Worksite Protection and Safety Equipment
Safety is a top priority. Equip yourself with safety glasses or goggles to shield your eyes from splinters and sawdust, cut-resistant work gloves for handling sharp edges, and a dust mask or respirator – especially critical if your home was built before 1978, as lead paint may be present. Add knee pads for comfort when working low to the ground and hearing protection when using loud power tools.
To protect your workspace, lay down drop cloths or plastic sheets both inside and outside the window area. Move furniture away from the work zone and remove any window coverings like blinds or curtains. Plan your installation for a sunny day to keep the vinyl flexible and to avoid rain entering your home while the window opening is exposed. Always work with a partner when moving or installing large windows, and avoid standing directly beneath a window being removed from the exterior.
Once your tools are ready and your workspace is secure, you’ll be all set to begin removing the old window.
sbb-itb-a4eb837
Removing the Existing Window
Now that your workspace is prepped and your tools are ready, it’s time to carefully remove the old window. This process requires patience and precision to avoid damaging the surrounding wall or frame, especially if you plan to reuse the trim pieces.
Scoring and Removing Interior Trim
Begin by using a utility knife to score the seam where the trim meets the wall and frame. This step helps prevent peeling paint or tearing drywall paper when you remove the trim. Once scored, use a pry bar to gently loosen the trim. To avoid damaging the wall, place a broad wood chisel, putty knife, or small block of wood behind the pry bar to spread the pressure evenly. Start at a corner or joint where the trim is already loose and work your way along, prying near each nail to reduce the chance of breaking the wood.
If you plan to reuse the trim, label each piece – such as "top", "left", or "right" – to keep track of their positions. Use pliers to pull out any remaining nails through the back of the trim to preserve the finished surface. Once you’ve removed the trim, you can move on to the window stops, sash, and fasteners.
Removing Window Stops, Sash, and Fasteners
Window stops are thin strips of wood or molding that keep the sashes in place. Most windows have three stops: one at the top and one on each side. Use your utility knife to score the paint or caulk line between the stop and the jamb, then gently pry the stops away with a chisel or pry bar.
For double-hung windows, remove the lower sash first, followed by the upper sash. If you’re working with sliding windows, lift the sash into the head of the frame and swing the bottom outward. In older windows, sashes may be connected to weights by cords. Cut these cords, allowing the weights to drop into the jamb pockets.
The parting stop, a small strip between the upper and lower sashes, is often covered in paint and may need to be broken out with pliers or a chisel. Remove any screws, nails, or staples holding the sashes, tracks, or hardware in place. Aluminum tracks are typically secured with staples, which can be pulled out using pliers. Once you’ve removed the sash weights, fill the empty cavities with fiberglass insulation or expanding foam to improve energy efficiency.
With all components removed, it’s time to clean and inspect the opening.
Cleaning and Inspecting the Opening
After removing the old window, thoroughly clean the opening to prepare it for the new installation. Use a shop vacuum to clear away dust, wood chips, and fine debris. Scrape off any loose paint, old caulk, stain, or leftover expanding foam from the interior and exterior surfaces of the window jambs.
Inspect the frame and rough opening carefully for any signs of rot, mold, splitting, or water damage. If you find rotted wood, replace it with new wood pieces secured with screws and wood glue.
Next, measure the opening diagonally from corner to corner. The measurements should be within 1/4 inch of each other to confirm the frame is square. Ensure there’s solid wood where the new window will be screwed into the frame, providing necessary stability. Fill any existing screw or nail holes with wood filler to create a smooth surface.
These steps are essential for ensuring that your new vinyl window is installed securely, improving energy efficiency and durability. With the opening clean and inspected, you’re ready to move on to the next stage of the process.
Preparing the Window Opening
With the old window out and the opening inspected, it’s time to create a solid, level, and waterproof base for your new vinyl window. Taking the time to properly flash and level the opening can help cut energy costs by up to 15% annually and avoid expensive water damage down the line.
Cleaning and Leveling the Window Sill
Start by clearing away any leftover debris, old caulk, or sealant from the rough opening. A putty knife or scraper works well for this, and a shop vacuum can help remove dust and fine particles, especially from the corners. Pay extra attention to the sill, as this is where the new window will rest.
Use a level to check if the sill is even. If it’s not, use wood or composite shims to create a flat surface. Place the shims where you’ll drive screws through the window frame. They should fit snugly without being forced, as over-shimming can distort the vinyl frame and cause issues with the window sashes.
If you’re replacing aluminum window frames with vinyl ones, you’ll need to add wood blocking to the sill’s sash tracks. This provides support for the weight of the new window and ensures a secure installation.
Applying Flashing Tape and Sealant
Waterproofing is critical to keep moisture out of your walls. Flashing tape should be installed using the "shingle-lap" method – start at the bottom and work your way up so water naturally flows outward over each layer.
Begin by applying flashing tape along the entire sill, extending it 6 to 8 inches beyond the rough opening. Fold the extra length up along the side trimmer studs to form 3- to 4-inch "end dams." If you’re adding a sill pan, include a 1/4-inch back dam on the interior side to stop water from entering the wall cavity. Use a J-roller to press the tape firmly into place for a secure seal.
Next, apply flashing tape to the side jambs, overlapping the sill tape by at least 2 inches. Then, flash the head (top) of the opening, ensuring it overlaps the side flashing. Before applying any tape, clean the surfaces with denatured alcohol to remove dust and oils that could interfere with adhesion.
Finally, run a continuous 3/8-inch bead of exterior-grade silicone or hybrid STPE sealant along the top and side exterior stops where the window frame will sit. Avoid sealing the bottom – this area needs to stay open so any trapped moisture can drain out through weep holes. This straightforward flashing process takes about 10 minutes per window and costs around $15 in materials, but it offers reliable, long-term protection against water damage.
Installing the New Vinyl Window
Once the opening is properly flashed and prepped, it’s time to set the window. Handle it carefully to avoid issues like binding sashes, air leaks, or even cracked glass.
Test-Fitting the Window
Start by closing and locking both sashes to keep the frame square. Lift the window into the opening for a dry fit. This step ensures everything aligns correctly.
Center the window in the opening and check the gap around it (known as the reveal). The gap should be a consistent 1/4 inch on all sides. To confirm the frame is square, measure diagonally from corner to corner; the two measurements should match within 1/8 to 1/4 inch.
Next, grab a 4-foot level to check that the side jambs are plumb (vertically straight). Use a torpedo level on the sill to confirm it’s level horizontally. Insert shims behind the pre-drilled screw holes to help maintain alignment. Once the window is square and aligned, you’re ready to secure it.
Fastening the Window in Place
After ensuring a proper dry fit, remove the window and apply a 3/8-inch bead of exterior-grade caulk along the back of the top and side nailing fins. Leave the bottom unsealed to allow for drainage. Carefully set the window back into the opening, making sure to align it with the same shim placements from the test fit.
Secure the window using #8 x 2-inch pan head screws. Space the screws every 12 inches, keeping at least 4 inches away from the corners. Tighten the screws just enough to hold the frame snug without distorting it. As Bob Vila advises:
Don’t over-tighten or the screw could pull the frame out of alignment. The window should be snug to the shims, and the shims to the frame, but not so much that the screw pulls through the frame or shifts its positioning.
Once fastened, test the window by opening, closing, and locking the sashes. If you notice any binding, adjust the screws or shims as needed. Once everything operates smoothly, you’re ready to move on to insulation and finishing.
Finishing and Sealing the Installation
Once the window is securely fastened, the final steps involve sealing gaps and completing the trim work to ensure a clean, airtight finish.
Insulating Gaps and Installing Trim
Start by filling the gap between the vinyl frame and the rough opening with low-expansion window-and-door spray foam. To protect the vinyl frame, use painter’s tape around the inside perimeter. This foam creates an airtight thermal barrier without risking damage to the frame.
Apply the foam carefully, filling only 30%-40% of the cavity to allow for expansion. As Mark J. Donovan from HomeAdditionPlus.com advises:
Key to a successful leak free vinyl window installation is properly flashing and sealing it.
Avoid using high-expansion foam, as it can distort the vinyl frame, void warranties, and affect the window’s operation. For gaps wider than 1/4 inch, insert a closed-cell foam backer rod first to provide a stable backing. Once the foam cures (follow the manufacturer’s instructions), trim it flush with a utility knife. Double-check for any voids and fill them as needed to ensure a complete seal.
Caulking and Drilling Weep Holes
Seal the exterior perimeter of the window with a continuous bead of 100% silicone or Class 25+ exterior-grade sealant. For best results, cut the nozzle of the caulk tube at a 45-degree angle to create a 1/4-inch opening. Hold the caulk gun at the same angle while applying an even bead, then smooth it immediately using a caulk tool or a wet finger to press the sealant into the gap. Pay extra attention to the top of the window (the head), as this is a critical area for preventing water leaks.
For clean, professional lines, apply painter’s tape 1/8 inch from the joint before caulking. Remove the tape after smoothing the sealant but before it begins to set. Do not seal weep holes – these small openings at the bottom of the frame allow water to drain and must remain unobstructed. Only apply caulk when the temperature is above 45°F and no rain is expected for at least 24 hours.
Cleaning and Testing Window Operation
Clean the window tracks and frames using mild soap and water. Avoid abrasive cleaners, which could scratch or damage the surface. Test the window by opening and closing the sashes to ensure smooth operation. Check the locking mechanism to confirm that the latches align properly and engage securely.
Inspect the reveal – the gap between the sash and frame – to ensure it’s even on all sides. If you notice binding or uneven gaps, adjust the shims or screws as needed. Proper sealing and alignment are crucial, as the Department of Energy notes that 25% to 30% of residential heating and cooling energy use comes from heat loss or gain through windows. These final checks not only ensure smooth functionality but also help maximize energy efficiency, keeping your home comfortable and your energy bills in check.
Conclusion
Installing vinyl windows on your own demands careful attention to detail at every stage. As installation expert Hotian puts it:
A successful installation or expensive errors depends on preparation.
Every step matters. Skipping something as seemingly minor as using the wrong foam or neglecting to check for squareness can lead to alignment problems and water leaks.
Common mistakes – like inaccurate measurements, improper shimming, and using the wrong sealant – can result in warped frames, water infiltration, and windows that don’t function properly. Taking the time to dry-fit the window, shim it to ensure it’s level and plumb, and apply the correct sealant protects your investment. Properly installed vinyl windows can last 20 to 30 years, and sealing them correctly might even cut your annual energy bills by up to 15%.
By steering clear of these missteps, you can achieve a durable and efficient installation. High-quality vinyl windows from Vinyl Windows Co come with features like reinforced frames, pre-drilled fastening points, and custom sizing – all designed to minimize installation errors and maintain structural integrity for years to come.
The quality of your installation determines whether your windows last three decades or fail prematurely. Following the steps in this guide – from protecting your worksite to testing the final operation – can save you 20% to 35% on total project costs. Stick to these guidelines, and you’ll not only safeguard your windows’ performance but also maximize energy efficiency.
FAQs
Do I need a permit to replace a window?
Replacing a window might or might not require a permit – it all depends on local rules and the specifics of your project. If you’re making structural changes, resizing the window, or altering the opening, a permit is usually required. However, for straightforward replacements that don’t involve modifying the existing opening, you might not need one. To avoid any surprises, it’s always a good idea to check with your local building department before kicking off your window replacement project.
How do I know if my rough opening is the right size?
Start by measuring the height, width, and depth of the rough opening at several points – such as the top, middle, and bottom for width. Always use the smallest measurement to guarantee the window will fit properly.
Next, check if the opening is square. To do this, measure the diagonals from corner to corner. If the two diagonal measurements are not equal, the opening isn’t square and will need adjustments.
Before installing your vinyl window, double-check that the opening matches the required dimensions and is perfectly square. These steps will save you time and ensure a smooth installation.
What should I do if the new window binds after install?
If your vinyl window feels stuck or difficult to open after installation, the first step is to clean the tracks thoroughly. Dust, dirt, and debris can build up and cause friction. Once the tracks are clean, apply a lubricant designed for windows to help them glide smoothly.
If the window still binds, the problem might be related to thermal expansion – vinyl can expand or contract with temperature changes – or even a structural issue. For more complicated problems, like a broken window balance, professional repairs might be required. Taking the time to clean, lubricate, and maintain your window can often prevent or fix these issues.


