

Want to boost your home’s resale value? Upgrading to vinyl windows can increase your home’s price by up to 68%, recover nearly 70% of installation costs, and save up to $465 annually on energy bills. Here’s a quick breakdown to help you make the most of this investment:
- Energy Efficiency: ENERGY STAR® vinyl windows can cut heating and cooling costs by 10–15%. Features like Low-E glass and insulated frames enhance performance.
- Curb Appeal: Modern designs and finishes improve your home’s exterior, attracting buyers.
- Low Maintenance: Vinyl resists warping, rotting, and fading, with minimal upkeep required.
Steps to Maximize Value:
- Inspect Current Windows: Check for drafts, fogging, and operational issues.
- Choose the Right Style: Match windows to your home’s architecture.
- Plan Your Budget: Vinyl windows range from $300–$900 per unit, with options for bulk discounts.
- Ensure Professional Installation: Certified installers protect warranties and ensure proper sealing.
- Maintain Regularly: Clean, inspect, and document upkeep to extend lifespan and reassure buyers.
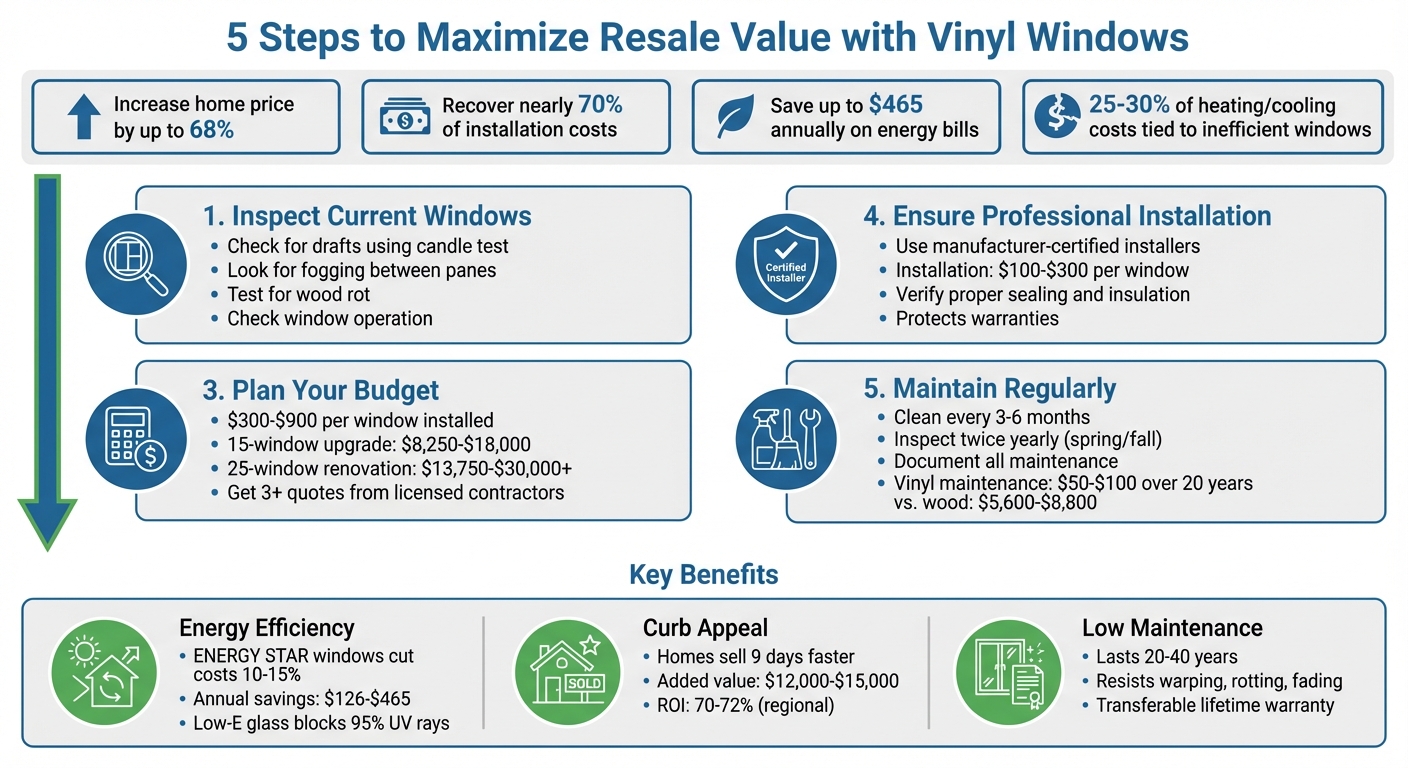
5-Step Process to Maximize Home Resale Value with Vinyl Windows
Before Installation
Check Your Current Windows
Take a close look at your existing windows to spot any issues that may be affecting your home’s energy efficiency. Did you know that 25–30% of your home’s heating and cooling costs can be tied to inefficient windows? That’s a significant chunk of your energy bill. Identifying problem areas early can save you money and protect your home.
Start by checking for drafts and air leaks. A simple way to test this is the candle test: hold a lit candle near the window frame. If the flame flickers or goes out, it’s a sign of a seal failure. Also, watch for fogging between panes that can’t be wiped away – this usually means the insulating gas has escaped. If you have wooden frames, press gently with a screwdriver or your finger. Soft or spongy wood indicates rot, which means it’s time for a replacement.
Don’t forget to check how your windows operate. Do they stick, jam, or refuse to stay open unless propped? These are signs of wear that can hurt energy efficiency and may even become an issue during a home inspection. If your heating or cooling system seems to be working overtime compared to previous years, your windows might be the culprit.
Once you’ve identified the problem areas, it’s time to think about the style of windows that will work best for your home.
Match Windows to Your Home’s Architecture
The style of your new windows should blend seamlessly with your home’s design. For example, double-hung windows are a perfect match for traditional or classic homes, while casement windows fit well with modern or contemporary designs. If your home has a historical feel, adding grid patterns (muntins) can help maintain its character.
“Choose window styles that complement your home’s architecture… Choosing windows that match your home not only boosts your curb appeal but sets you apart from the competition.” – Window Source Atlanta
Today’s vinyl windows come in a variety of colors and finishes to match your siding or trim. Larger windows at the front of the house can create a welcoming focal point, while avoiding unusual shapes helps maintain harmony with your neighborhood. If you’re looking to add a touch of elegance, consider installing bay or bow windows in living or dining areas. They not only enhance curb appeal but also provide additional interior space.
Now that you’ve thought about style, the next step is to figure out your budget.
Plan Your Replacement Budget
With a clear understanding of your window needs and design preferences, it’s time to outline your budget. This step ensures you’re prepared for costs and can make the most of your investment. On average, vinyl windows cost $300–$900 per window installed, with standard double-hung windows priced between $350 and $1,250. If you’re considering architectural options like bay or bow windows, expect to spend $2,000–$7,500 or more per unit.
Replacing all your windows at once can often lead to bulk discounts and a consistent look throughout your home. For example, a 15-window mid-size upgrade might cost $8,250–$18,000, while a 25-window full renovation ranges from $13,750 to over $30,000. Don’t forget to account for extra costs like permits ($50–$200), old window disposal, and possible trim repairs.
To get the best value, secure at least three itemized quotes from licensed contractors. Look into federal tax credits and local utility rebates for ENERGY STAR® certified products to help offset some of the initial costs. Keep in mind, labor typically makes up 25–40% of the total cost. If possible, schedule your installation during the off-season when contractors may offer discounts.
sbb-itb-a4eb837
Choosing the Right Vinyl Windows
Selecting the perfect vinyl windows can significantly boost your home’s resale value, potentially adding $12,000–$15,000 to its worth. To make the most of your investment, focus on three critical factors: energy efficiency, frame durability, and style compatibility. These priorities ensure your upgrade balances performance with visual appeal.
Focus on Energy Efficiency
Energy-efficient windows are a smart choice for both cost savings and buyer interest. Opt for Energy Star-certified windows, which can cut annual heating and cooling expenses by 10% to 15%, translating to savings of $126 to $465 per year depending on your climate. Not only do these windows lower operating costs, but they also make your home more attractive to eco-conscious buyers.
For maximum performance, look for features like Low-E (Low-Emissivity) glass, which reflects heat during summer and retains it in winter. This technology also blocks up to 95% of harmful UV rays, protecting your furniture and flooring from fading. Additional insulation comes from argon or krypton gases and warm-edge spacers, which improve energy retention and reduce condensation.
“Vinyl windows can reduce heat transfer by up to 30% compared to aluminum, making them a smart choice for energy-conscious homeowners.” – U.S. Department of Energy
Check the NFRC (National Fenestration Rating Council) label for key performance ratings. In colder climates, prioritize windows with a low U-factor (0.30 or less) to minimize heat loss. For hotter areas, like Texas or Florida, focus on a low Solar Heat Gain Coefficient (SHGC) to block excessive solar heat and reduce cooling costs. If noise is a concern – such as living near an airport or a busy road – consider triple-pane glass, which provides excellent soundproofing and adds to buyer appeal.
Select Durable, Low-Maintenance Frames
The durability of vinyl frames plays a crucial role in the overall quality of your windows. High-quality vinyl windows can last 20 to 40 years with little maintenance. However, not all vinyl is created equal. Choose frames made from virgin vinyl, which resists warping, cracking, and discoloration better than recycled materials, especially in extreme weather conditions.
“The titanium dioxide in high-quality replacement vinyl windows makes the window more heat resistant… and protects it from future discoloration from the sun’s rays.” – Stronghouse
For added longevity, look for fusion-welded corners instead of screw-fastened frames. Welded corners create a strong, airtight bond that won’t loosen over time. Inside the frame, multi-chambered designs improve insulation and structural strength by trapping air within the chambers.
A transferable warranty is another must-have feature. Buyers value the peace of mind that comes with a 20-year or lifetime warranty that transfers to the next homeowner. Ensure the warranty covers material defects and confirm it remains valid only if certified professionals install the windows.
Pick Styles That Fit Your Home
The style of your windows should complement your home’s design while appealing to a broad range of buyers. Popular, timeless window styles offer both curb appeal and practical functionality. When it comes to color, white remains a classic choice, but contemporary finishes like black or bronze are gaining traction. For a more traditional look without the upkeep, some vinyl frames replicate the texture and appearance of real wood. Choose styles and finishes that enhance your home’s overall aesthetic while maintaining universal appeal.
Installation Requirements
Even the best vinyl windows can underperform if installed incorrectly. Proper installation not only ensures energy efficiency but also boosts potential buyers’ confidence in your home’s quality. On the flip side, poor installation can lead to drafts, void manufacturer warranties, and decrease energy savings – all of which can hurt your home’s resale value.
“It doesn’t matter if you buy the best windows out there; if they aren’t installed correctly, they aren’t going to last as long as they should.” – Southwest Exteriors
Use Certified Installers
Choosing the right installer is crucial for protecting warranties and ensuring expert craftsmanship. Look for manufacturer-certified professionals, such as authorized Vinyl Windows Co dealers, who are trained in the specific installation requirements of the product. Before committing, confirm that the installer has a valid trade license, comprehensive liability insurance, and workers’ compensation coverage. Always request physical Certificates of Insurance (COI) for verification and check their Better Business Bureau (BBB) rating. Additionally, ask for references from projects completed within the last three years.
The cost of professional installation typically ranges from $100 to $300 per window, or between $50 and $65 per hour. Make sure the installer offers a labor warranty, separate from the manufacturer’s product warranty, which should cover their work for 5 to 10 years. Once you’ve hired certified professionals, the focus shifts to ensuring proper sealing and insulation.
Verify Proper Sealing and Insulation
Sealing and insulation are critical to maintaining energy efficiency and avoiding drafts. Before installation begins, the installer should take precise measurements at three points (both vertically and horizontally) for each window opening to account for any structural shifts in your home.
The rough opening must be square within 1/4 inch, and shims should be used to level the window. A continuous bead of weather-resistant caulk should be applied around the frame. Gaps should be filled with expanding foam insulation, but care must be taken to avoid overfilling. High-quality exterior-grade caulk should always be used instead of cheaper alternatives.
Before making the final payment, test each window to ensure smooth operation and check for any drafts. Once the installation is complete, proper documentation becomes essential.
Save Installation Documentation
Keeping detailed records of your window installation not only validates the quality of the work but also increases buyer confidence. Manufacturer warranties often require professional installation, and documentation serves as proof.
Create a buyer information packet that includes the following:
- Original receipts and itemized invoices
- Manufacturer warranty certificates with transfer instructions
- Labor guarantees from the installer
- Proof of the installer’s certification or authorized dealer status
Additionally, retain any ENERGY STAR labels or performance stickers that come with the windows. These labels provide proof of energy efficiency, which can save homeowners between $100 and $465 annually. Take photos during the installation process, especially of sealing, flashing, and insulation before the trim is installed. Store all documentation in one folder, along with the installer’s contact and licensing information, for easy access in case future service is needed.
Ongoing Maintenance Tasks
Once your vinyl windows are installed, keeping up with regular maintenance is essential to protect their longevity and value. Properly cared-for windows can last 25 to 35 years, while neglected ones might only make it 15 to 20 years. Dedicating just 30 to 60 minutes per window annually can help prevent 70–80% of common problems like seal failures and hardware issues.
Clean and Inspect Regularly
Plan to clean your window frames and sashes every 3–6 months using either dish soap with warm water or a mix of 30% white vinegar and 70% water. For those living near the coast, monthly cleaning may be necessary due to the extra exposure to salt. Start by vacuuming the tracks and sills with a hose attachment to remove loose dirt – this prevents liquid cleaners from turning debris into a stubborn mess.
Avoid harsh cleaners like bleach, ammonia, or acetone, as well as power washers, since they can discolor or damage vinyl and seals. After rinsing, dry the frames immediately with a soft, lint-free cloth to avoid water spots. Cleaning during cooler parts of the day, rather than in direct sunlight, can also prevent streaking.
Conduct a thorough inspection twice a year, ideally in spring and fall. Check the hardware, seals, and weatherstripping for any cracks, gaps, or wear. Damaged seals can lead to drafts and moisture problems, so be on the lookout for any hardening or gaps in the weatherstripping. Also, inspect the weep holes at the bottom of the frame every 6 to 12 months. If they’re clogged, clear them out with a thin wire or pipe cleaner. Once a year, apply a silicone-based lubricant to moving parts like hinges, locks, and tracks. Avoid oil-based products like WD-40, which can attract dust and create sticky residue.
Address any minor issues you find during these cleanings right away to avoid bigger problems down the road.
Fix Minor Problems Promptly
Small issues, if ignored, can quickly turn into costly repairs. Test for drafts by holding a gentle flame near the edges of the window – if it flickers, you may need to replace weatherstripping or reapply caulking. Inspect exterior caulking annually, and use exterior-grade caulk to fill any gaps.
If you notice condensation or fogging between glass panes, it’s often a sign of a broken seal in the insulated glass unit, which will likely require professional replacement. Additionally, tighten any loose screws in the hardware periodically to prevent further damage. Replacing weatherstripping typically costs $20–$50 per window, while a can of silicone lubricant runs about $20.
Once you’ve completed repairs and preventive measures, take steps to document everything.
Document All Maintenance
Keep a detailed log of every cleaning, repair, and inspection in a dedicated folder. Include dated photos, receipts, and notes about the products you used, such as specific lubricants or cleaners. This documentation not only helps track the care you’ve provided but also serves as proof for potential buyers. It reassures them that the windows have been well maintained and can even support your asking price during a sale. Proper records don’t just extend the lifespan of your windows – they also highlight the value of your home to future buyers.
Preparing Information for Buyers
Once you’ve ensured top-notch installation and maintenance, the next step is preparing detailed information for potential buyers. This effort can significantly boost buyer confidence and even enhance your final sale price when it’s time to sell.
Calculate Energy Savings
Start by showcasing the energy savings your windows provide. For instance, Energy Star-certified double-pane vinyl windows can save homeowners between $236 and $583 annually on energy bills, depending on your climate and the type of windows replaced. If you have utility bills from before and after the installation, use them to demonstrate the actual savings.
Don’t forget to highlight maintenance savings. Over 20 years, wood windows can cost between $5,600 and $8,800 to maintain (including painting, staining, and weatherstripping). By contrast, vinyl windows require only $50 to $100 during the same period. The long-term cost difference is a compelling argument for buyers.
This kind of documented evidence not only underscores savings but also sets the stage for explaining the added value these windows bring to your home.
Show Added Home Value
Build on the energy savings by presenting additional financial benefits. For example, if your windows qualified for federal tax credits (up to $600 in 2025) or local utility rebates, make sure to highlight those savings. Regional return on investment (ROI) figures can also help. Homeowners in the Pacific region (California, Washington, Oregon) enjoy a 72% ROI, while those in the Mid-Atlantic (Pennsylvania, New Jersey) see 70%. Tailoring this information to your specific market helps buyers understand the value they’re inheriting.
Additionally, homes with recently replaced windows tend to sell up to nine days faster in competitive markets. With buyers increasingly prioritizing Energy Star-rated windows, this becomes a key selling point that makes your home stand out right from the start.
Create a Buyer Information Packet
Use your saved installation and maintenance records to create a comprehensive packet for potential buyers. Include warranty documentation – especially if it’s a transferable lifetime warranty that covers labor, glass, frames, and seals. Add NFRC ratings showing the U-factor and Solar Heat Gain Coefficient, along with Energy Star labels. A maintenance log with dated photos, receipts, and contractor installation certificates should also be part of this folder.
Be sure to list technical details such as double or triple panes, argon or krypton gas fills, and multi-chambered frames. If your windows include features like multi-point locking systems or impact-resistant glass, emphasize those security benefits as well. This packet removes uncertainty for buyers and reassures them that they’re investing in a well-maintained home with high-quality, professionally installed windows.
Conclusion
Boosting your home’s resale value with vinyl windows comes down to three main steps: selecting energy-efficient options, ensuring professional installation, and keeping up with regular maintenance. Opting for windows with ENERGY STAR certification, Low‑E coatings, and multi‑pane construction is a smart move. These features address the fact that windows contribute to 25–30% of a home’s heating and cooling energy use, which can lead to noticeable savings for potential buyers.
Professional installation is just as important as choosing the right windows. Even the best windows can’t perform as intended if they’re not installed correctly. Proper installation prevents air leaks and moisture issues, which can void warranties and create expensive problems down the road. This also signals to buyers that your home has been well cared for, reducing the likelihood of immediate repairs.
Long-term maintenance is another key factor in preserving both the look and performance of your windows. Simple tasks, such as cleaning frames, inspecting seals, and conducting yearly checks, can keep your windows in great shape for years to come. Documenting installation details, warranties, and energy savings adds credibility and helps build buyer trust, making your home even more appealing.
Vinyl windows with features like insulated glass, low-maintenance frames, and transferable lifetime warranties give your property a real edge. Homes with energy-efficient upgrades can sell for up to 8% more than similar properties. Following these steps ensures your investment not only enhances your home’s value but also makes it a standout choice for serious buyers looking for a modern, energy-efficient, and move-in-ready property.
FAQs
How do I choose the best window ratings for my climate?
When choosing the right window ratings for your climate, it’s important to focus on a few key energy performance metrics, especially the U-Factor and Solar Heat Gain Coefficient (SHGC):
- U-Factor: This measures how well a window insulates. A lower U-Factor means better insulation, which is particularly useful in areas with extreme hot or cold temperatures.
- SHGC: This indicates how much solar heat a window allows in. For hotter climates, lower SHGC values are better to reduce heat gain, while in colder regions, higher SHGC values can help retain warmth.
Additionally, look into ratings for condensation resistance and air infiltration. These factors can further enhance energy efficiency and improve overall comfort in your home.
What paperwork should I save to help at resale?
Save all paperwork that confirms the quality and upkeep of your vinyl windows. This includes receipts, warranties, and any documentation related to their purchase and installation – especially for energy-efficient or high-end models. Additionally, keep records of maintenance, upgrades, or certifications. These documents not only showcase the value of your investment but can also enhance your home’s resale appeal.
Which vinyl window upgrades add the most buyer appeal?
Upgrades that draw in buyers often include energy-efficient windows with double or triple glazing, sleek, modern designs, and low-maintenance vinyl frames. These elements not only enhance curb appeal but also offer energy savings and long-lasting durability – qualities that make a strong impression on potential buyers.


